Top 10 Actionable Realty Photography Tips for Agents in 2026
In the current visually-driven real estate market, your listing photos are your primary sales tool. Before a potential buyer ever sets foot on the property, they have already formed a strong opinion based solely on the images they see online. Subpar photography directly translates to fewer clicks, lower engagement, and ultimately, missed showings and lost opportunities. The critical difference between a listing that stagnates and one that sells quickly often comes down to the quality of its visual presentation.
This guide provides ten actionable realty photography tips designed specifically for agents and teams looking to elevate their marketing. We will move beyond generic advice and dive into the specific techniques, camera settings, and strategic workflows that transform standard property photos into compelling marketing assets that drive results. You will learn practical methods for mastering interior lighting, composing shots that create a sense of space and flow, and implementing post-processing best practices for a professional, polished look.
From leveraging advanced tools like virtual staging to developing a consistent brand aesthetic across all your listings, these tips will equip you to capture images that stop scrollers in their tracks. By implementing these strategies, you can generate more qualified leads, create a stronger impression on buyers, and secure the best possible outcomes for your clients. We will cover everything you need to know, from pre-shoot preparation to optimizing your final images for every online platform.
1. Master Lighting Techniques for Interior Photography
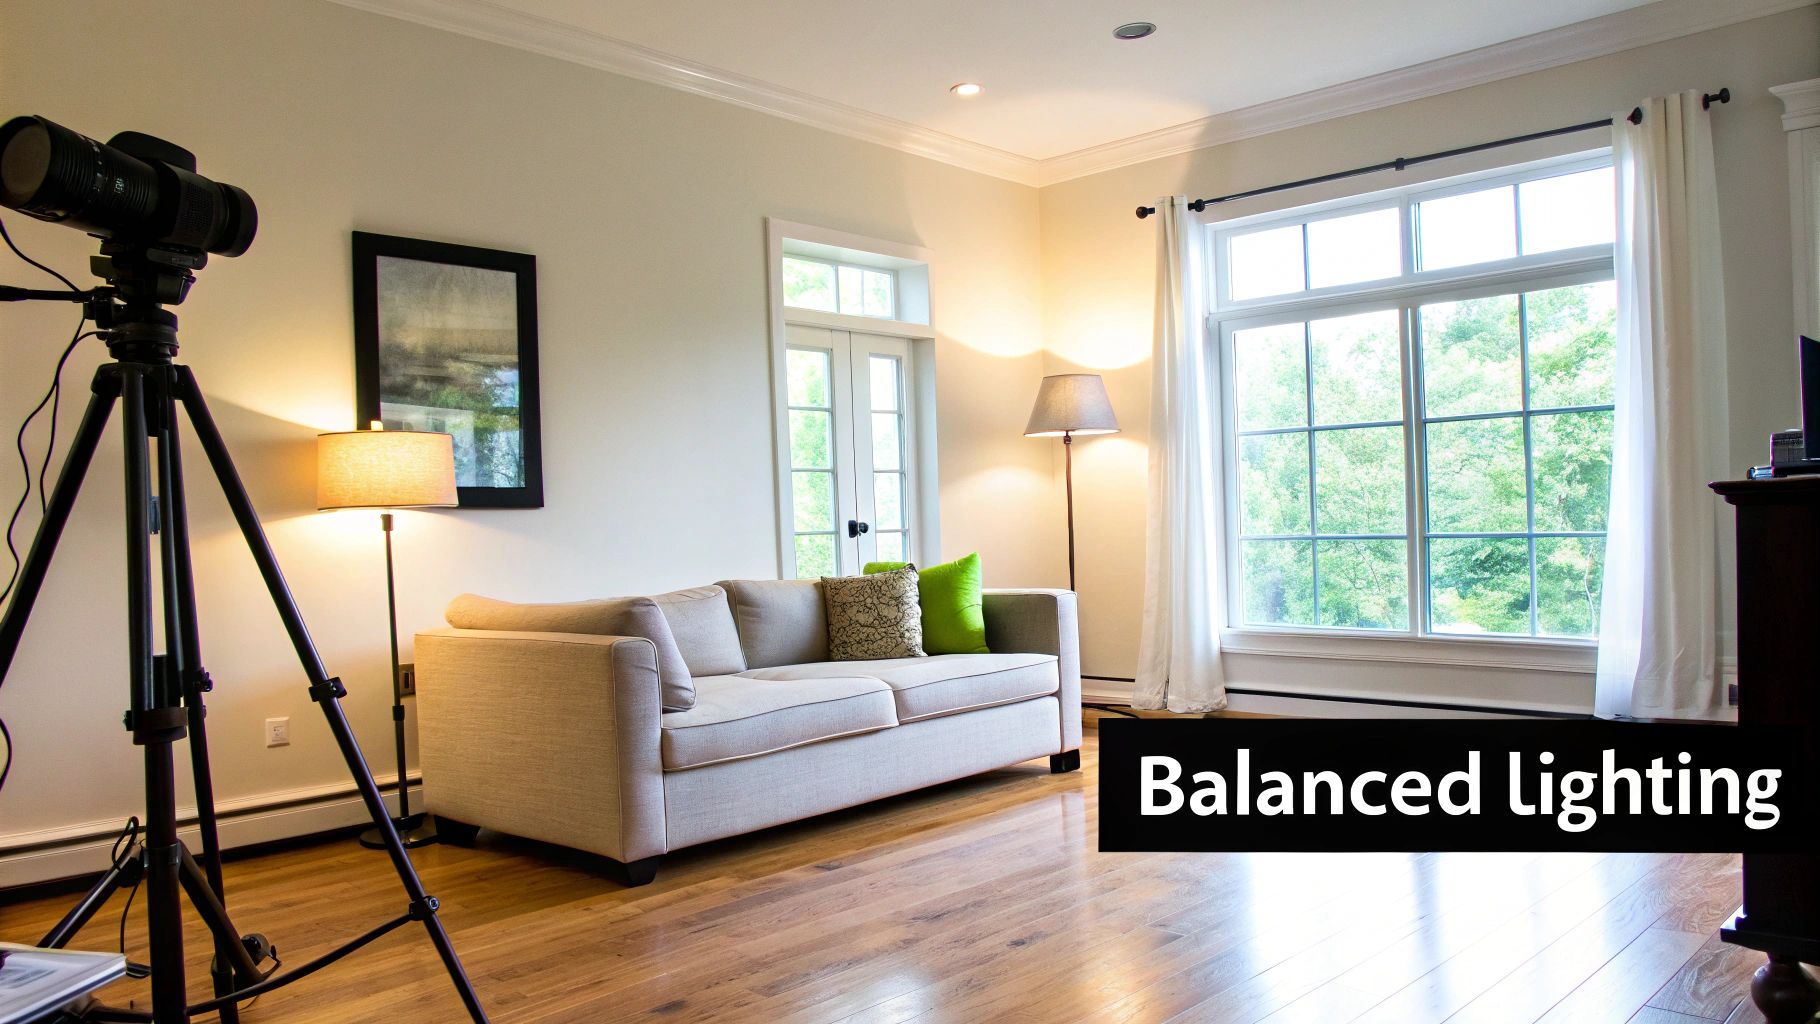
Professional lighting is the cornerstone of compelling real estate photography. It's the difference between a flat, uninviting snapshot and a dynamic, appealing image that captures a buyer's attention. Mastering lighting involves skillfully balancing natural light from windows with artificial sources to eliminate harsh shadows and prevent blown-out highlights. This technique makes rooms appear brighter, more spacious, and helps potential buyers emotionally connect with the home. Since your listing photos are the property's first impression, excellent lighting is a non-negotiable part of your realty photography tips arsenal.
Why Lighting is a Game-Changer
Proper lighting directly impacts how a buyer perceives a property's value and appeal. Poorly lit photos can make a home feel small, dark, and dated. In contrast, a well-lit space feels warm, clean, and welcoming. Top real estate photographers like Mike Kelley have built careers on mastering this skill, proving that strategic lighting can dramatically increase a listing's online engagement. By controlling the light, you control the narrative, showcasing the home's best features and creating an aspirational vision for buyers.
Actionable Lighting Tips for Agents
To immediately improve your interior shots, integrate these practices:
- Turn On All Lights: Before you shoot, switch on every lamp, overhead light, and sconce. This adds warmth and creates a layered, lived-in feel.
- Use a Fill Flash: Don't rely solely on your camera's pop-up flash. An external flash, bounced off a ceiling or wall, can gently fill in dark shadows without creating a harsh, direct glare.
- Shoot for HDR: High Dynamic Range (HDR) photography involves taking multiple pictures at different exposure levels and merging them. This technique, often available as a setting on modern smartphones and cameras, captures rich detail in both the bright window views and the darker interior corners simultaneously.
- Plan Around Natural Light: Schedule your shoot when the home receives the most indirect natural light. Avoid direct, harsh midday sun, which creates strong shadows. Open all blinds and curtains to maximize this effect.
2. Use Wide-Angle Lenses for Space Maximization
A wide-angle lens is an indispensable tool in real estate photography, allowing you to capture a room in its entirety and create a feeling of spaciousness. Lenses with a focal length between 16-35mm are the industry standard for making interiors feel open, airy, and inviting. This perspective allows buyers to see how rooms connect and envision themselves within the space, a powerful psychological effect that significantly boosts a property's marketing appeal. Using the right lens is one of the most impactful realty photography tips for turning a standard room into an expansive-looking feature.
Why a Wide-Angle View is a Game-Changer
A standard lens simply cannot capture the full scope of a room, often resulting in cramped and incomplete photos. A wide-angle lens, however, expands the field of view, making even smaller rooms feel more substantial and grand. This technique is standard practice in luxury listings, where lenses like the Canon EF 16-35mm are used to showcase sprawling interiors and emphasize a home's generous proportions. By presenting a broader perspective, you give potential buyers a better understanding of the layout and flow, helping them make a stronger connection to the property before they even visit.
Actionable Wide-Angle Tips for Agents
To effectively maximize space without creating unnatural distortion, apply these professional practices:
- Shoot from the Corners: Position your camera in a corner to capture the maximum amount of the room in a single frame. This diagonal perspective adds depth and dimension.
- Keep Vertical Lines Straight: One of the biggest pitfalls of wide-angle lenses is distortion, where walls appear to bend. Keep your camera perfectly level and ensure all vertical lines (door frames, walls, windows) are straight up and down.
- Find the Sweet Spot: A 20-24mm focal length is often the ideal compromise. It's wide enough to make a room feel spacious but not so wide that it creates an unrealistic "fisheye" effect.
- Maintain a Natural Height: Set your tripod to about chest or eye level (around 5 feet). Shooting too low or too high can skew the room's perspective and make it feel unbalanced.
3. Employ Strategic Staging and Decluttering Before Shooting
Staging is the art of preparing a property for photography by decluttering, strategically arranging furniture, and adding decor to create inviting focal points. It's the critical step that happens before the camera even comes out of the bag. This pre-photography preparation directly impacts how a home appears in images, making spaces feel larger, brighter, and more appealing. Well-staged homes photograph significantly better, leading to more compelling listing photos that drive buyer interest and command higher perceived value.

Why Staging is a Game-Changer
Proper staging helps buyers emotionally connect with a property by allowing them to envision themselves living there. According to the National Association of REALTORS, professionally staged homes not only sell faster but can also command a higher price. This preparation removes personal distractions and highlights the home’s best architectural features. By presenting a clean, organized, and stylish space, your photography can tell a story of an aspirational lifestyle, not just showcase an empty building. This is one of the most impactful realty photography tips for creating a powerful first impression.
Actionable Staging Tips for Agents
To ensure your listing is camera-ready, incorporate these pre-shoot preparations:
- Declutter Ruthlessly: Before shooting, remove at least 50% of visible personal items. For a deeper dive into this crucial first step, it helps to understand how to declutter and organize effectively to prepare the space.
- Neutralize and Depersonalize: Remove family photos, bold artwork, and personal collections. The goal is to create a neutral canvas that appeals to the widest possible audience.
- Arrange Furniture for Flow: Position furniture to define each room's purpose and create clear pathways. This simple change can make rooms look significantly larger on camera.
- Add Lifestyle Touches: Introduce elements like fresh flowers, a bowl of fruit on the kitchen counter, or a neatly folded throw blanket. These small details add color, life, and a sense of warmth to the photos. Learn more about the specific techniques of home staging to master this skill.
4. Capture Multiple Angles and Perspectives of Each Room
Professional real estate photography goes beyond a single, wide shot of each room. To give potential buyers a comprehensive understanding of a property's layout, size, and unique features, you must capture each space from multiple strategic angles. This multi-perspective approach showcases architectural details, highlights the flow between rooms, and provides a more immersive virtual experience. In today's market, where listings often feature 30-50 photos, providing varied viewpoints of primary rooms is not just a bonus; it's an essential part of your realty photography tips toolkit.
Why Multiple Angles are a Game-Changer
A single photograph can be misleading, but a series of well-composed shots tells a complete story. Research from platforms like Zillow confirms that listings with more photos receive significantly more views and engagement. Capturing a room from different angles answers buyers' questions before they even ask them, reducing follow-up inquiries and building confidence. This technique allows you to feature a room's best assets, such as a cozy fireplace, custom built-ins, or a stunning view, in dedicated shots while also providing a clear sense of the overall space.
Actionable Tips for Multi-Angle Shots
To effectively showcase every room, integrate these shooting strategies:
- Shoot 3-5 Angles Per Room: For key spaces like the living room, kitchen, and primary bedroom, aim for at least three to five distinct shots.
- Start with a Corner Shot: Always include one wide shot taken from a corner. This is the most effective way to capture the room's maximum depth and dimensions in a single frame.
- Include Detail and Feature Shots: After capturing the wide views, take dedicated close-ups of unique features like custom tilework, high-end appliances, or architectural details.
- Show the Flow: Take "transition shots" from doorways or entry points to illustrate how one room connects to the next, helping viewers mentally map the home's layout.
- Maintain a Consistent Height: For most shots, keep your camera at a standard eye level (around 5 feet) to create a natural, relatable perspective. Slightly varying the height can add interest, but avoid drastic, distorting angles.
5. Optimize Composition with the Rule of Thirds
The Rule of Thirds is a foundational composition principle that instantly elevates real estate photography from a simple snapshot to a professional, gallery-worthy image. By dividing your frame into nine equal sections with two horizontal and two vertical lines, you create a grid that guides the viewer's eye. Placing key architectural details, furniture, or focal points along these lines or at their intersections produces a more balanced, dynamic, and engaging photo. This technique is one of the most crucial realty photography tips for creating images that feel intentional and visually appealing.
Why Composition is a Game-Changer
Strategic composition directly influences how a potential buyer emotionally responds to a property photo. A centered, symmetrical shot can feel static and boring, while an image using the Rule of Thirds feels natural and guides the eye through the space, encouraging longer engagement. Studies of MLS listing performance have shown that listings with well-composed photos receive higher click-through rates. By mastering this simple grid, you're not just taking a picture; you're crafting a visual narrative that makes the home feel more inviting and thoughtfully presented.
Actionable Composition Tips for Agents
To immediately apply the Rule of Thirds and improve your listing photos, follow these practices:
- Enable Your Grid Overlay: The easiest first step is to turn on the grid display in your camera or smartphone settings. This visual guide makes applying the rule effortless.
- Position Key Features at Intersections: Place the most important element, like a fireplace, a stylish light fixture, or a window with a view, at one of the four intersection points.
- Align Horizons and Lines: For exterior shots, place the horizon line along the top or bottom third line, not in the center. Inside, align strong vertical lines like door frames or corners with the vertical grid lines.
- Create Depth and Balance: Use foreground elements, like a corner of a kitchen island or a decorative chair, in the bottom third of the frame to anchor the shot and add a sense of depth.
6. Utilize Virtual Staging and 3D Visualization Tools
Virtual staging is a powerful, modern tool that digitally furnishes and styles empty or outdated rooms in your listing photos. Instead of the high cost and logistical hassle of physical staging, this technology allows you to showcase a property's full potential with aspirational, market-ready visuals. This technique is especially transformative for vacant homes, new constructions, or properties needing a design refresh, helping buyers visualize themselves living in the space. Including this in your realty photography tips toolkit is essential for competing in a digital-first market.
Why Virtual Staging is a Game-Changer
An empty room is a question mark for buyers, but a virtually staged room is an answer. This technology bridges the imagination gap, significantly boosting a listing's emotional appeal and perceived value. Data shows that listings with virtual staging sell up to 25% faster than their empty counterparts and can lead to a 30% increase in showing requests. By using AI-powered platforms like Saleswise or BoxBrownie, agents can create multiple design aesthetics to target different buyer demographics without ever moving a single piece of furniture. This strategic advantage helps properties stand out online and reduces marketing timelines.
Actionable Virtual Staging Tips for Agents
To effectively integrate this technology into your listings, follow these best practices:
- Start with Quality Photos: Virtual staging is most effective when applied to clean, well-lit, high-resolution images. A great base photo produces a hyper-realistic final result.
- Match the Style to the Buyer: Choose furniture and decor styles that align with your target demographic. Offer variations like modern, traditional, or transitional to broaden appeal.
- Be Transparent: Always disclose that the images are virtually staged in your listing description. This builds trust and manages buyer expectations.
- Focus on Problem Areas: Use virtual staging to give purpose to awkward or empty spaces like bonus rooms, basements, or spare bedrooms. If you want to dive deeper into its applications, you can learn more about virtual staging for real estate and how it enhances marketing.
7. Capture Exterior and Curb Appeal Photography Strategically
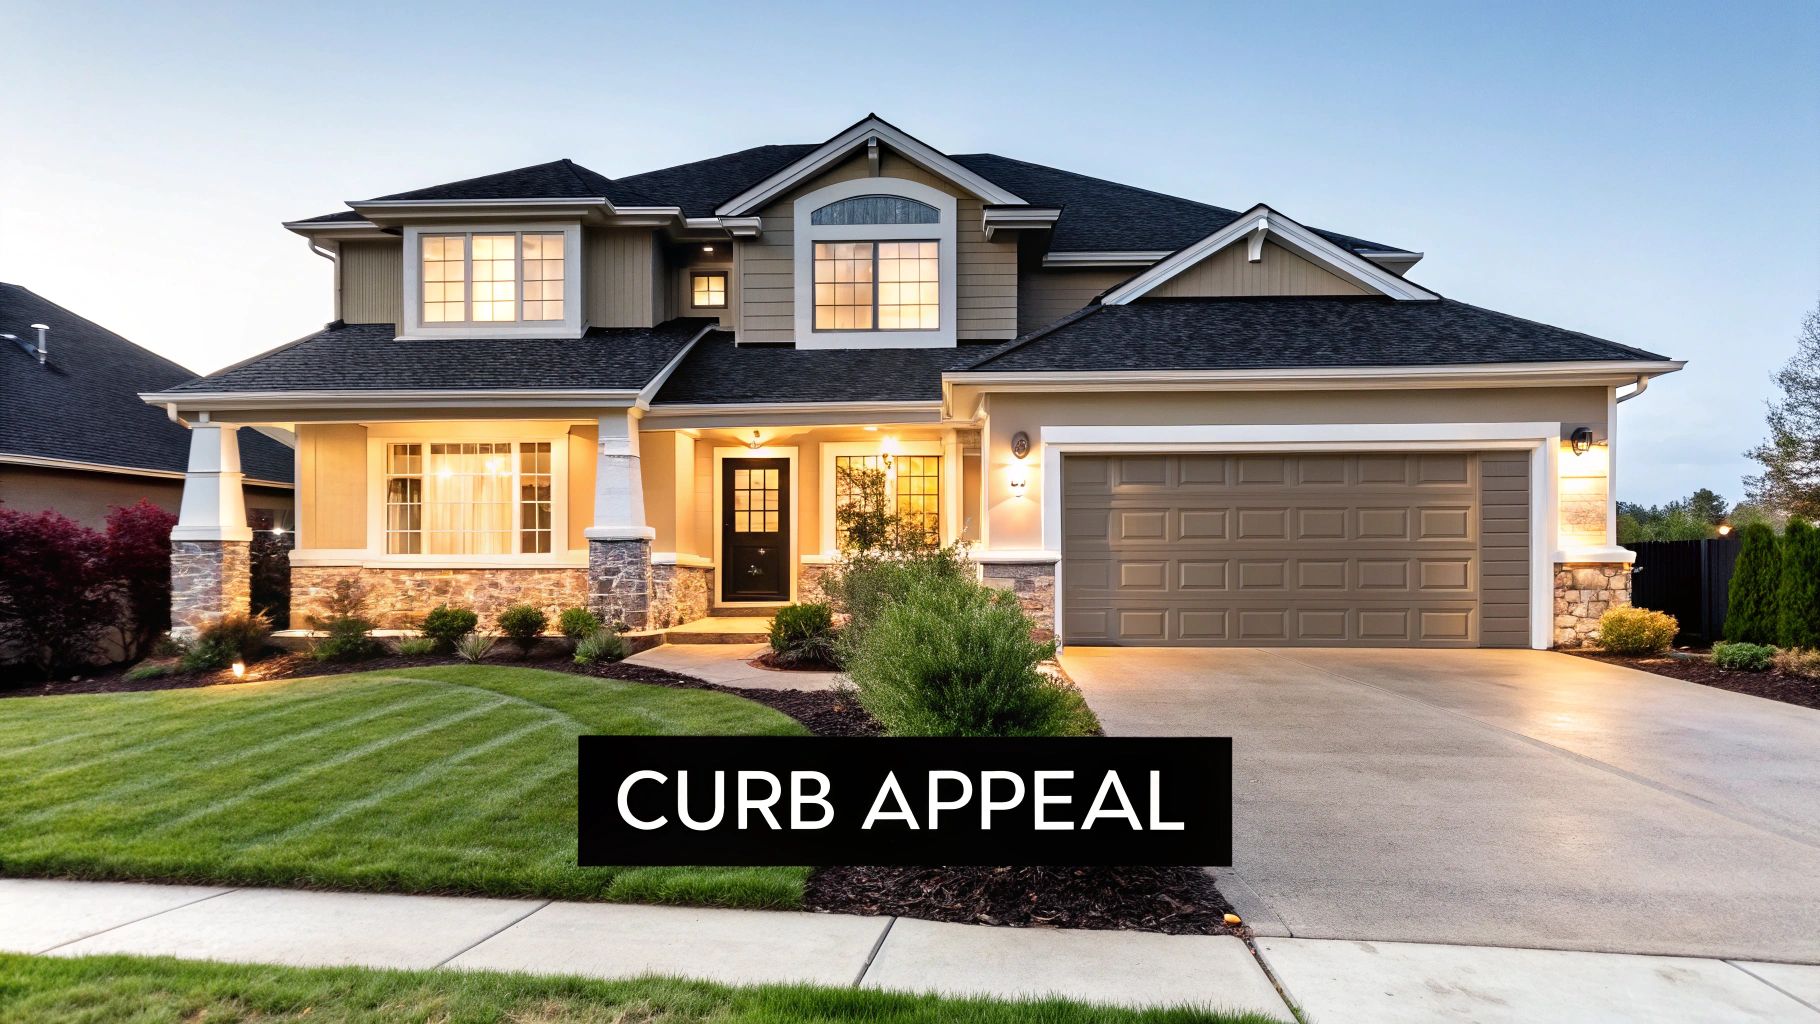
The exterior shot is almost always a property's main marketing image and the very first impression for a potential buyer. Strategic curb appeal photography goes beyond a simple front-on picture; it aims to capture the home's architectural essence, highlight its landscaping, and create an emotional invitation. High-quality exterior photos are proven to increase online click-through rates, drive more showing requests, and ultimately, help a property sell faster and for a higher price, making this one of the most critical realty photography tips.
Why Exterior Shots are a Game-Changer
A compelling exterior photograph sets the tone for the entire listing. Zillow data has consistently shown a direct correlation between the quality of the primary photo and the number of clicks a listing receives. Furthermore, properties featuring professional drone photography have been shown to get up to 68% more views. When a buyer sees a stunning twilight shot or a perfectly framed view of the home nestled in its environment, it creates an immediate sense of aspiration and value before they've even seen the interior.
Actionable Exterior Photography Tips for Agents
To make your listing's first impression unforgettable, implement these professional techniques:
- Schedule for the Golden Hour: Shoot during the hour after sunrise or before sunset. This "golden hour" provides warm, soft, and directional light that makes homes look dramatic and inviting while eliminating harsh midday shadows.
- Declutter the Curb: Before the shoot, ensure all vehicles are moved from the driveway and street. Hide garbage cans, gardening tools, and any other distracting clutter to present a clean, polished look.
- Showcase Key Features: Position your camera to highlight the home's best architectural elements, such as a grand entryway, unique windows, or a charming porch. Shoot from multiple angles and distances to provide a comprehensive view.
- Consider a Twilight Shot: For a high-end feel, a "dusk" or twilight photo is a powerful option. Turn on all interior and exterior lights as the sun sets to create a warm, luxurious glow that stands out dramatically online.
- Use a Drone for Context: If the property has a large lot, stunning views, or unique surroundings, drone photography is invaluable. It provides a crucial perspective on the home's scale and its relationship to the neighborhood and landscape.
8. Implement Post-Processing and Photo Editing Best Practices
Taking the photo is only half the battle; the magic truly happens in post-processing. This editing phase is where raw images are transformed into polished, professional marketing assets. It involves carefully adjusting exposure, correcting color balance, straightening lines, and enhancing details to present the property in its best possible light. Effective editing enhances reality without misrepresenting it, ensuring photos are both captivating and trustworthy, a crucial balance in any list of realty photography tips.
Why Editing is a Game-Changer
Professional post-processing elevates listing photos from amateur to high-end, directly influencing a buyer's perception of value. Even the best cameras cannot perfectly capture what the human eye sees, often producing images that are too dark, have skewed colors, or distorted lines. Editing corrects these flaws, making a space feel bright, clean, and accurately proportioned. High-end studios often have multi-step editing workflows, dedicating significant time to each image because they know a polished photo can stop a buyer from scrolling and inspire them to book a showing.
Actionable Editing Tips for Agents
To bring a professional finish to your photos, implement these best practices:
- Use Professional Software: Start with industry-standard tools like Adobe Lightroom or Capture One. These programs offer powerful, non-destructive editing capabilities far beyond basic photo apps.
- Correct White Balance First: Before any other adjustment, ensure your colors are accurate by setting the correct white balance. This makes walls look their true color and gives the entire photo a natural, clean feel.
- Straighten Your Lines: Use perspective correction tools to ensure all vertical lines (door frames, walls, windows) are perfectly straight. This simple fix makes photos look instantly more professional and architectural.
- Enhance Subtly: Gently increase vibrance and clarity to make details pop, but avoid oversaturation. The goal is to create a vibrant, realistic image, not an artificial or cartoonish one. Many MLS systems even monitor for excessive editing.
9. Develop and Maintain Consistent Photography Standards Across Listings
Establishing a consistent visual identity is a hallmark of a professional and trustworthy real estate brand. This involves creating and adhering to a set of photography standards for every listing, ensuring that whether a buyer sees your $200,000 condo or your $2 million luxury estate, the quality and style are instantly recognizable. This consistency builds brand equity and sets a clear expectation of professionalism for clients, making your marketing efforts more effective. Adopting this practice is a key component of any advanced list of realty photography tips.
Why Consistency is a Game-Changer
In a crowded market, a consistent visual brand acts as a silent salesperson. When potential buyers and sellers repeatedly encounter your high-quality, uniformly styled photos, they associate your name with reliability and excellence. Leading luxury brokerages like Sotheby’s International Realty have perfected this, ensuring their global listings share a cohesive, high-end aesthetic. This strategy not only attracts buyers but also appeals to potential sellers who want their property represented by a top-tier agent. Consistency also streamlines your workflow, making the entire photography and marketing process faster and more efficient.
Actionable Tips for Creating Your Standards
To build and maintain a consistent look across your portfolio, implement these practices:
- Create a Brand Guidebook: Document your standards. Specify camera settings (aperture, ISO, shutter speed ranges), lens choices, and preferred shooting angles for different rooms.
- Develop Editing Presets: Use software like Adobe Lightroom to create and save editing presets. This ensures every photo has the same color temperature, brightness, contrast, and saturation, creating a signature look.
- Establish a Shot List: Define the minimum number of photos required for each listing and specify the essential shots for each room (e.g., one wide-angle shot, one detail shot of a key feature).
- Standardize Your Equipment: Whether you shoot yourself or hire a photographer, use the same core equipment (camera body, wide-angle lens, tripod, and flash) for every property to maintain a consistent visual quality.
10. Optimize Photos for Online Listing Platforms and Mobile Viewing
Even the most stunning property photos can fail if they aren't technically optimized for where buyers will see them: online. Optimization ensures your images load quickly, display correctly, and look sharp on every device, from a wide desktop monitor to a small smartphone screen. Since the vast majority of home searches now happen on mobile devices, this step is absolutely critical. Properly optimized photos improve user experience, boost engagement, and ensure your professional realty photography tips translate into tangible results.
Why Optimization is a Game-Changer
In the digital marketplace, speed and accessibility are paramount. Slow-loading images frustrate potential buyers and can cause them to abandon your listing entirely. Conversely, listings with fast-loading, mobile-friendly photos see significantly higher engagement, sometimes by as much as 40%. A well-sized thumbnail can also increase click-through rates by over 20%, drawing more eyes to your listing from a crowded search results page. This technical step directly impacts your listing's performance, influencing how many people see it, engage with it, and ultimately schedule a showing.
Actionable Optimization Tips for Agents
Integrate these technical best practices into your workflow to ensure maximum online impact:
- Use the Right Format and Size: Save final images as JPEGs for the best balance of quality and file size. A resolution around 2500x1600 pixels is a versatile sweet spot for most platforms.
- Compress Files Intelligently: Aim for a file size between 100KB and 200KB. Use tools like Adobe Lightroom's export settings or online compressors to reduce size without sacrificing noticeable quality. To ensure your listing photos load quickly and display beautifully on various online platforms, understanding choosing the right image format for web performance is crucial.
- Follow MLS Guidelines: Every MLS has specific requirements for image dimensions and file sizes. Always check their latest guidelines before uploading to avoid distortion or rejection.
- Enhance with Alt Text: When uploading to your website, include descriptive alt text for each image (e.g., "bright modern kitchen with granite countertops"). This improves SEO and makes your listing accessible to visually impaired users. Once the photos are perfect, you can focus on crafting compelling property descriptions that complement your visuals.
10-Point Realty Photography Comparison
| Technique | Complexity 🔄 | Resources & Speed ⚡ | Expected outcomes ⭐📊 | Ideal use cases 💡 |
|---|---|---|---|---|
| Master Lighting Techniques for Interior Photography | High — advanced setup & learning curve | High equipment (lighting, diffusers, tripod); long setup time | ⭐ Excellent exposure, depth, perceived value; 📊 higher engagement & faster sales | Luxury listings, tight interiors, hero images |
| Use Wide-Angle Lenses for Space Maximization | Medium — composition skill to avoid distortion | Medium cost lens; quick capture; low setup | ⭐ Expands perceived space; 📊 fewer shots needed, higher appeal | Small rooms, apartments, showcasing open layouts |
| Employ Strategic Staging and Decluttering Before Shooting | Medium — planning and coordination required | Variable cost/time; may need professional stager | ⭐ Strong buyer visualization; 📊 higher price and faster sales | Occupied homes, mid/high-end listings, pre-shoot prep |
| Capture Multiple Angles and Perspectives of Each Room | High — time-intensive and consistency required | High time, storage, and editing effort | ⭐ Comprehensive spatial understanding; 📊 increased engagement and fewer surprises | Virtual tours, luxury properties, detailed listings |
| Optimize Composition with the Rule of Thirds | Low — easy to learn and apply in-camera | Minimal equipment; fast to implement on shoot | ⭐ More balanced, professional images; 📊 improved click-through | All listings; quick composition improvement for teams |
| Utilize Virtual Staging and 3D Visualization Tools | Low–Medium — tool-driven with oversight | Low physical cost; software/subscription; very fast turnaround | ⭐ Multiple design options; 📊 cost-effective marketing; risk of artificial look | Vacant properties, new builds, rapid marketing iterations |
| Capture Exterior and Curb Appeal Photography Strategically | Medium — weather/timing dependent; planning needed | Drone or telephoto gear; schedule for golden hour | ⭐ Strong first impression; 📊 higher click-through and showing requests | Standalone homes, properties with notable landscaping or views |
| Implement Post-Processing and Photo Editing Best Practices | Medium — software skill and workflow discipline | Software subscriptions; moderate time per image | ⭐ Corrected, consistent, realistic images; 📊 improved listing quality | All listings; fix exposure, color, perspective before staging |
| Develop and Maintain Consistent Photography Standards Across Listings | High — documentation, training, and enforcement | Time to create standards; equipment and training investment | ⭐ Brand trust and repeatable quality; 📊 efficiency and premium positioning | Brokerages, teams, franchises seeking consistent branding |
| Optimize Photos for Online Listing Platforms and Mobile Viewing | Medium — technical formatting and monitoring | Tools for resizing/compression; create multiple variants | ⭐ Faster loads and better mobile UX; 📊 increased engagement and SEO | Mobile-first audiences, high-traffic portals, MLS compliance |
From Photos to Profits: Implementing Your New Visual Strategy
Navigating the world of real estate photography can seem complex, but as we've explored, mastering this crucial skill is not about becoming a professional photographer overnight. Instead, it's about strategically implementing a set of foundational principles that transform your properties from mere listings into captivating visual stories that resonate with buyers. The journey from a simple point-and-shoot approach to a deliberate, results-driven visual strategy is what separates good agents from great ones.
By embracing the realty photography tips detailed in this guide, you are equipping yourself with a powerful arsenal to command attention in a crowded digital marketplace. We have moved beyond the basics, diving into the specifics of how lighting, composition, and technology converge to create an emotional connection with potential buyers before they even step foot inside the property.
Recapping Your Path to Photographic Excellence
Let's distill the core takeaways into a clear, actionable roadmap. The most successful agents don't just take pictures; they create a comprehensive visual package for each listing.
- Foundational Techniques: Mastering the basics of lighting and composition, like using the rule of thirds and shooting during the golden hour, is non-negotiable. These are the building blocks upon which all other efforts stand.
- Strategic Preparation: The work begins long before the camera comes out. Meticulous decluttering, thoughtful staging, and creating a detailed shot list ensure every frame is optimized for maximum impact. This preparation turns a house into a home in the buyer's imagination.
- Technological Leverage: Embracing tools like virtual staging, 3D tours, and professional-grade editing software is no longer a luxury but a necessity. These technologies bridge the gap between a property's current state and its future potential, a critical step in accelerating a buyer's decision-making process.
- Consistency is Key: Developing and adhering to consistent photography standards across all your listings builds a recognizable, trustworthy brand. Buyers begin to associate your name with quality, professionalism, and beautifully presented homes.
From Theory to Tangible Results
The ultimate goal of improving your real estate photography is not just to have prettier pictures; it's to drive tangible business outcomes. High-quality images directly correlate with higher click-through rates, more showing requests, and faster sales cycles. When a buyer can vividly imagine themselves living in a space, they are more likely to take the next step.
Key Insight: Your property photos are the single most important marketing asset for any listing. They are your first, and often only, chance to make a powerful impression that converts online interest into offline action. Investing time and resources into these visual assets yields one of the highest returns in your marketing budget.
Think of each tip not as an isolated task but as an integrated part of a larger marketing engine. Your wide-angle shots create a sense of space, your post-processing enhances the mood, and your consistent branding builds long-term equity. These realty photography tips work in concert to build momentum for your listings and your career.
The path forward is clear: start small, but start now. Choose one or two areas from this guide to focus on for your next listing. Perhaps it's committing to a pre-shoot decluttering checklist or experimenting with bracketing your shots for better dynamic range. As you master one skill, integrate another. This iterative process will steadily elevate the quality of your visual marketing, leading to more engaged clients, stronger offers, and a more robust sales pipeline. Your camera is not just a tool for documentation; it's a powerful instrument for persuasion and profit.
Ready to amplify the power of your stunning new photos? Saleswise uses advanced AI to instantly create compelling listing descriptions, social media content, and even virtual staging mockups directly from your images. Bridge the gap between great photography and a closed deal by leveraging AI to market your properties faster and more effectively. Explore how Saleswise can revolutionize your marketing workflow today.